

To make macramé, you attach lengths of cord to a dowel or a ring and tie them by hand into a pattern of knots, with no hook, needles or loom. A first piece needs soft cotton cord, a support, sharp scissors, a tape measure and three basic knots. The most important decisions come before the first knot, because cord thickness and cut lengths are hard to change once the work has started.
Macramé at a glance:
- Soft cotton cord 3–5 mm thick is the easiest to start with, in single-twist, three-ply or braided form.
- Three knots are enough for a simple wall hanging: the lark’s head that attaches cords to the dowel, the square knot tied on four cords and the double half hitch.
- Every cord is folded in half on the dowel, so straight strands 60 cm long need lengths of just over 120 cm.
- The triangle-net wall hanging in this guide uses 16 lengths of 2.5 m, a dowel at least 32 cm long and a fringe trimmed 30 cm below the knots.
What is macramé?
Macramé is the technique of knotting cord by hand into decorative patterns, and also the name for pieces made this way. The word comes from the Turkish makrama, a napkin or towel, which itself derives from Arabic, and it reached English through Italian and French. In the 19th century macramé was a speciality of Genoa, where towels trimmed with knotted cord were popular, and its roots lie in a 16th-century knotted lace known as punto a groppo. Sailors tied decorative knots at sea and sold or bartered the results when they came ashore. In the 1960s macramé became a popular craft in Europe and America.
What do you need to start macramé?
A first project needs cord, something to hang it from, sharp scissors and a tape measure. The support is usually a wooden dowel or a branch, while plant hangers start from a metal or wooden ring. For the patterns in this guide, the dowel should be at least 32 cm long for 16 cords and 40–60 cm long for a hanging of straight strands.
While you knot, the dowel needs to hang at a comfortable height, from a clothes rail, the back of a chair, a banister or a cupboard handle. Macramé can also be worked flat on a table, but cords that hang freely are easier to knot. Beads, wooden elements and feathers can be worked into the pattern, and craft shops sell macramé kits that usually come with the maker’s own instructions.

Which cord should you use, and how much do you need?
Soft, flexible cotton cord 3–5 mm thick is the easiest to start with. Stiff cord makes every knot harder to tighten and can put a beginner off a first project. Cords also differ in how they are made. Single-twist cord is soft and combs out into a full fringe, but it is more delicate and can untwist as you work. Three-ply cord, made of three strands twisted together, is stronger and holds its shape, and its ends can also be unravelled into a wavy fringe. Braided cord does not unravel, which suits practical pieces such as coasters, bags and plant hangers. Besides cotton, macramé is knotted in linen, hemp, jute and strips of fabric such as T-shirt yarn.
The amount of cord depends on the pattern. Every length attached with a lark’s head is folded in half, so one length gives two strands. For a hanging of straight, unknotted strands, each length should be slightly more than twice the finished length. Knots take up cord, so the denser the knotting and the thicker the cord, the longer each length has to be. The wall hanging described below uses 16 lengths of 2.5 m, 40 m of cord in total.

Which macramé knots should beginners learn first?
A first wall hanging needs three knots: the lark’s head, the square knot and the double half hitch. The lark’s head attaches cords to the dowel. Fold a length in half, lay the loop over the dowel, bring both ends through it and pull tight.
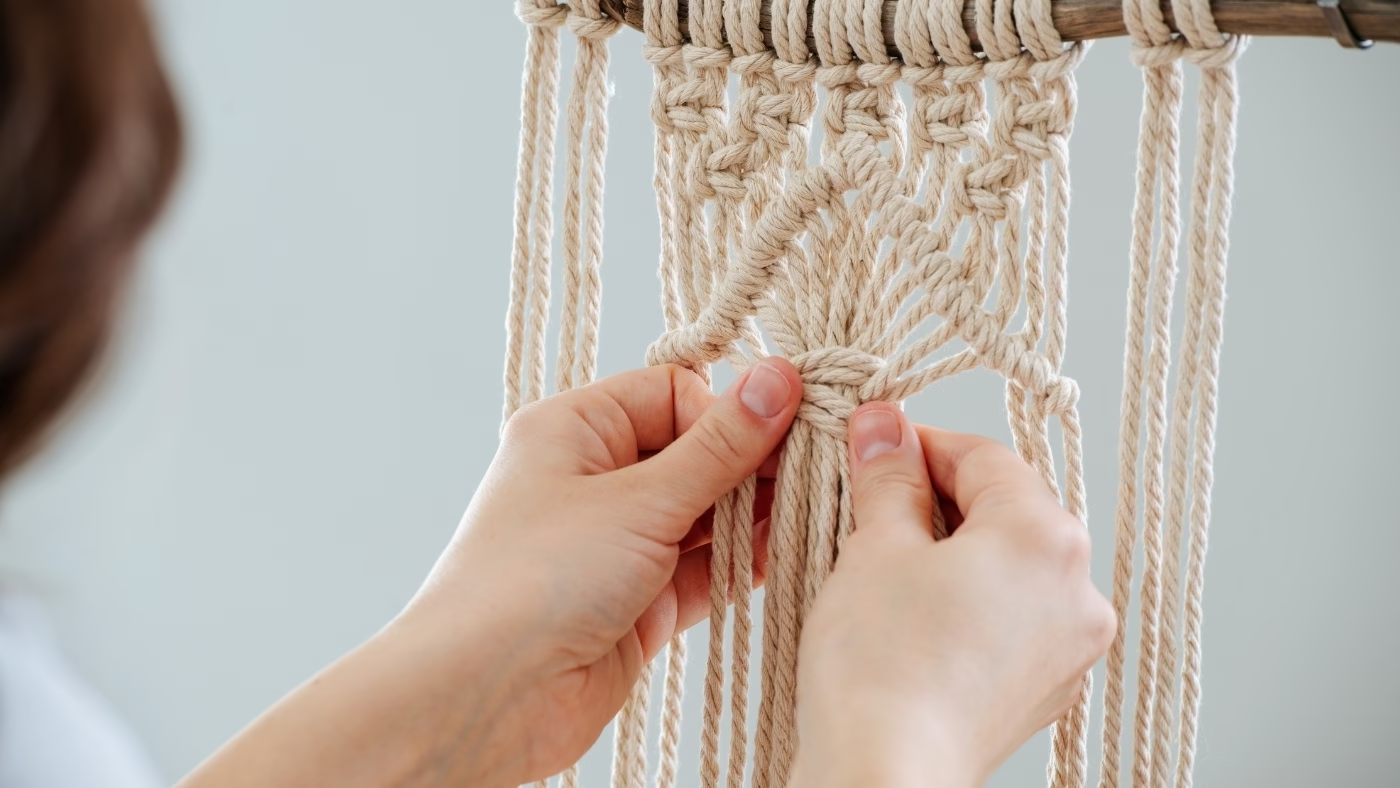
The square knot is tied on four cords: the two in the centre form the core and the two outer cords do the knotting. Take the right-hand cord over the core to the left so that it forms a loop. Lay the left-hand cord over its end, pass it under the core and up through the loop on the right, then slide the knot up. This is half a square knot. The second half is tied the same way starting from the left, and the two halves together lock the knot. Repeating the same half over and over twists the cords into a spiral, used for example for the arms of plant hangers. Rows of square knots, each row shifted two cords along, produce an open net, as in the wall hanging below.
The double half hitch draws lines across a piece. One cord is held taut as the holding cord, and each of the other cords is wrapped around it twice and pulled tight. Depending on the angle of the holding cord, the line runs horizontally or diagonally.
A fourth knot, the gathering knot, also called a wrapping knot, binds a bundle of cords together. A separate cord is wound several times around the bundle, its end is passed through a loop and pulled tight, and the spare tails are trimmed. This is how the top or bottom of a plant hanger is usually closed.
How do you make a simple macramé wall hanging?
This wall hanging is built from two knots, the square knot and the double half hitch, with lark’s heads at the top. You need 16 lengths of cord of 2.5 m each, 40 m in total, a dowel at least 32 cm long, scissors and a tape measure. Before you start, hang the dowel from a clothes rail, the back of a chair or a banister.
- Attach the cords. Hang each length on the dowel with a lark’s head until 16 heads sit side by side. Space them so the heads do not overlap, but not so far apart that the square knots become awkward to tie.
- Knot a triangle of square knots. Take the four cords on the far left and tie a square knot, then carry on across the dowel to complete the first row. Start the second row two cords in, so that each knot sits between two knots of the row above, and keep going row by row until a row holds a single knot.
- Add two rows of double half hitches. Take the outermost cord on the left as the holding cord and wrap each hanging cord around it twice, pulling the loops tight so the row sits snugly against the net. On this side, the last cord to knot is the left core cord of the final square knot. Repeat from the right, join the two rows by knotting one holding cord over the other, then work a second row of double half hitches on both sides.
- Run square knots on the diagonal. Tie a square knot on the next four cords, then tie the following knot with two cords from the previous one and two new cords, so that the knots overlap. Work down both sides, join them with a square knot and repeat the sequence to make two rows.
- Finish the pattern with one row of double half hitches. Knot it the same way as before. The knotted part of the hanging is now complete.
- Trim the cords. Measure 30 cm down from the end of the knotting at three points: at the start, in the middle and at the end of the hanging. Cut the fringe to a point, then lay the hanging on the floor, straighten the cords and tidy any uneven ends.

What are easy macramé projects for beginners?
Small pieces make the best start: keyrings, coasters, bookmarks, macramé feathers and leaves, and little wall hangings. A keyring uses only a handful of cords, and a coaster is a short run of square knots that can be finished in a spare moment. A plant hanger also works as a first project, because it relies on a few basic knots. It starts from a ring, with the cords attached by lark’s heads or bound with a gathering knot. The arms are tied in square or spiral knots, the cords then meet in a net of alternating square knots that holds the pot, and a gathering knot closes the bottom.
If even a net of square knots feels like too much at first, a hanging of straight strands needs no knotting beyond the lark’s heads. Cut the cords to just over twice the finished length, attach them to a dowel 40–60 cm long, leaving about 10 cm of dowel free at each end, and tie on a length of cord to hang it by.
In this version the effect comes from colour. Twisted cotton cord takes fabric dye well, so the hanging is dipped first to two-thirds of its length in the lighter dye, then to between a third and a half in the darker one. You need two bowls, two dyes from the same colour family and rubber gloves. Wet cord looks darker than dry, so judge the shade with that in mind. The hanging dries overnight, hung by its cord over an empty bowl, and ragged ends can be evened out by sticking masking tape across the strands just above them and cutting along its edge.
What mistakes should beginners avoid?
Cord that is too thin is harder to handle at the start, and a project beyond your current skills can put you off before it is half done. Cutting lengths too short is another trap, and it may only become clear halfway through a pattern. A new length can then be joined in with a knot, so the work does not have to be undone.
If you dye your cords, protect the table first with plastic sheeting or an old oilcloth under the bowls, as fabric dye marks surfaces easily. Small irregularities in a first piece are part of handmade work, and a badly tied knot can always be loosened and tied again.

Where does macramé work in an interior?
Macramé is a staple of boho interiors, where it hangs alongside wood, feathers and light colours. It also suits other schemes built on natural materials: rustic interiors, the calm natural style that keeps wall decoration to a minimum, and coastal interiors, where it is paired with wicker and rattan. In light schemes of white, beige and wood, close to Scandinavian boho, a knotted piece brings texture to otherwise plain walls.
How to make macramé – frequently asked questions
Is macramé hard to learn?
No. The technique rests on a few simple knots and needs no artistic training, only patience and some time. Anyone who has knotted friendship bracelets has already used it: the thread and the result are different, but the knots work the same way.
How long does a macramé project take?
A small wall hanging can be finished in an hour or two, while larger, more detailed pieces take several hours. Dyeing adds a night of drying.
How do you clean macramé?
Start with the care instructions on the cord label, as they depend on the fibre. Dust comes off with a soft brush. When a piece needs washing, wash it gently by hand without bleach, skip the tumble dryer and leave it to dry flat.
Can you use free macramé patterns from the internet?
Yes. Free written patterns and video tutorials are widely available, both for the basic knots and for complete projects such as wall hangings and plant hangers.
What can you make with macramé?
Macramé is used for wall hangings, plant hangers, lampshades, hammocks, curtains, jewellery, bags and coasters, as well as dream catchers, table runners and hanging chairs.
The size of a macramé piece, the colour of its cord and the wall it hangs on all shape the scheme of the whole room, and a larger change to an interior is easier to plan with a designer. Find architects, interior designers and interior photographers in the PLNDesign directory.
See also:
- How to wash net curtains without creasing or discolouring them
- How to remove damp and musty smells from a wardrobe